SIDO Råmåttsmätning/en: Skillnad mellan sidversioner
Hoppa till navigering
Hoppa till sök
Erik (diskussion | bidrag) Skapade sidan med '= Installation of SIDO Board Measurement =' |
Erik (diskussion | bidrag) Skapade sidan med '# Execute '''”SIDOBoardMeasurement.msi”''' # Follow the instructions and install the application. # In the Windows Start menu, locate the program '''”SIDO Board Measurem...' |
||
| Rad 19: | Rad 19: | ||
= Installation of SIDO Board Measurement = | = Installation of SIDO Board Measurement = | ||
# | # Execute '''”SIDOBoardMeasurement.msi”''' | ||
# | # Follow the instructions and install the application. | ||
# | # In the Windows Start menu, locate the program '''”SIDO Board Measurement”'''. Right click on it and select '''”Run as administrator”'''. | ||
# | # Enter the path to '''DIRECTORY''' where the .sido file is stored (point 12 under MarCom installation). | ||
# | # Enter the URL that you received from us in the second field. <br />[[Fil:Sido1.png]] | ||
# | # Click on Start service. | ||
# | # The program installs as a service in Windows. | ||
# | # Open '''”Services”''' in Windows and make sure the service is running. <br />[[Fil:Sido2.png]] | ||
# | # Make a measurement with value 0.0 <br />If the caliper is not already a registered meter in SIDO, it will be created and will then be visible both on the administration page in SIDO and selectable in the measurement of dimensions on the assignment display. | ||
# | # The caliper can now be used when measuring dimensions. | ||
Versionen från 25 november 2016 kl. 12.16
Instructions for installing the caliper from Mahr and SIDO board measurement service.
Installation av MarCom
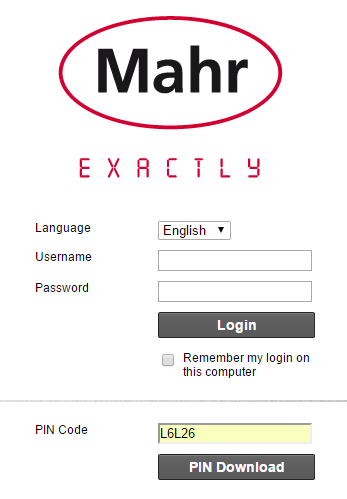
- Gå till sidan https://dam.mahr.com

- PIN-Code: L6L26
- Klicka på ”PIN-Download” följt av ”Download” på nästa skärm.
- Nedladdningen startar. Filen är ganska stor, nästan 100 Mb.
- När nedladdningen är klar, gå till kataolgen där filen sparades och packa upp filen ”MarConnect--MarCom_Standard--MarCom_5.1-2--SW—Standard.zip”.
- Kör ”S e t u p-MarCom.exe” i den uppackade katalogen.
- Följ alla instruktioner och installera alla nödvändiga drivrutiner.
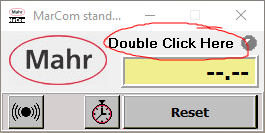
- MarCom programmet startas automatiskt när installationen är klar. Om det inte startas, klicka på MarCom-ikonen på skrivbordet.
- Dubbelklicka på texten ”Double Click Here”

- Anslut USB-stickan till datorn.
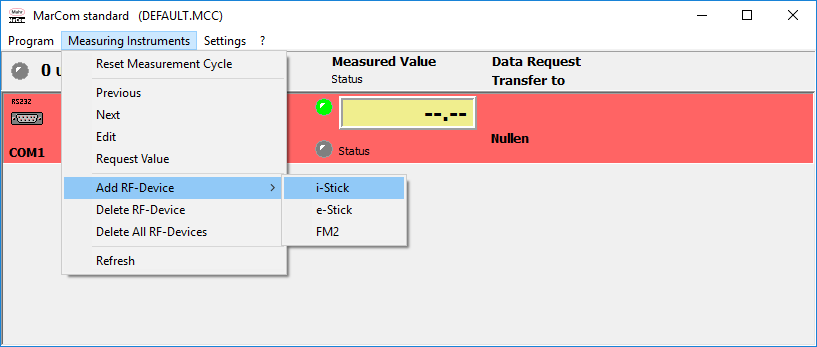
- Lägg till mätinstrument - ”i-Stick”.

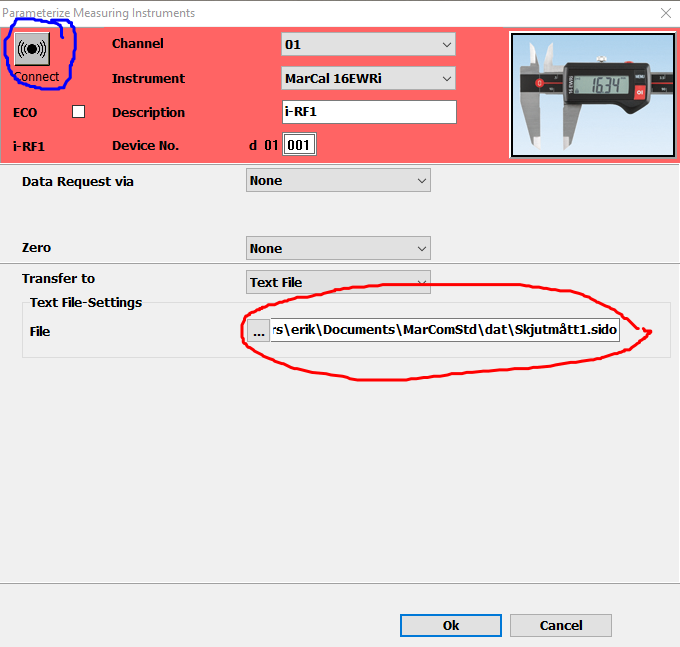
- Välj instrument ”MarCal 16EWRi” och ”Transfer to -> Text File”
Välj var du vill spara text-filen.
Namnet på filen blir det namn som mätaren kommer att få i SIDO.
VIKTIGT! Filändelsen måste vara .sido
- Anslut till mätaren genom att klicka på Connect-ikonen i samma fönster (blå markering), inte från ”startfönstret”. Klicka Ok och stäng fönstret.
- När skjutmåttet är anslutet ändras ”connect-ikonen” till grön och man kommer att se mätvärdena på displayen.
Installation of SIDO Board Measurement
- Execute ”SIDOBoardMeasurement.msi”
- Follow the instructions and install the application.
- In the Windows Start menu, locate the program ”SIDO Board Measurement”. Right click on it and select ”Run as administrator”.
- Enter the path to DIRECTORY where the .sido file is stored (point 12 under MarCom installation).
- Enter the URL that you received from us in the second field.

- Click on Start service.
- The program installs as a service in Windows.
- Open ”Services” in Windows and make sure the service is running.

- Make a measurement with value 0.0
If the caliper is not already a registered meter in SIDO, it will be created and will then be visible both on the administration page in SIDO and selectable in the measurement of dimensions on the assignment display. - The caliper can now be used when measuring dimensions.