SIDO/en: Skillnad mellan sidversioner
Erik (diskussion | bidrag) Skapade sidan med 'Some key features: *All types of scheduled tasks. *Easy to use *Cloud-based *Error/incident reporting *Instructions/routines' |
FuzzyBot (diskussion | bidrag) Uppdaterar för att matcha den nya versionen av källpaketet |
||
| (29 mellanliggande sidversioner av 2 användare visas inte) | |||
| Rad 1: | Rad 1: | ||
<languages/> | |||
<div lang="sv" dir="ltr" class="mw-content-ltr"> | <div lang="sv" dir="ltr" class="mw-content-ltr"> | ||
[[Fil:SIDO_SawInfo.png|miniatyr]] | [[Fil:SIDO_SawInfo.png|miniatyr]] | ||
| Rad 12: | Rad 14: | ||
*Instructions/routines | *Instructions/routines | ||
SIDO can be run on computers, mobile phones and tablets. No installation is required as everything runs in the browser. | |||
SIDO | |||
< | <span id="Uppdragsskärmen"></span> | ||
= | =Assignments screen= | ||
The assignments screen displays the assignments that are current for the selected department. | |||
The assignments screen is divided into departments and areas. The missions have different colors depending on the status of the mission. | |||
<div lang="sv" dir="ltr" class="mw-content-ltr"> | <div lang="sv" dir="ltr" class="mw-content-ltr"> | ||
| Rad 32: | Rad 27: | ||
</div> | </div> | ||
*'''Green'''<br>Completed and acknowledged assignment | |||
*''' | *'''White'''<br>Assignments that are open to work on. These are within a time frame that you want the assignment to be completed within. | ||
*''' | *'''yellow'''<br>Ongoing assignments | ||
*''' | *'''Red'''<br>Delayed assignments. These should have already been completed but are delayed for one reason or another. | ||
*''' | *'''Blue'''<br>Assignments that are planned to start in the future but where work cannot begin yet. | ||
*''' | |||
How long and how many completed (green) assignments are displayed and how far into the future an upcoming assignment (blue) should be displayed can be set generally for a department or individually for an assignment. | |||
If you have scheduled a task to be done at certain intervals, the next task will be created when you acknowledge the task. | |||
There are also individual assignments (one-time assignments) that only need to be done once and will therefore not create any new assignments. | |||
< | <span id="Instruktioner"></span> | ||
== | ==Instructions== | ||
Under instructions, you can collect different types of information that you want your staff to have access to. This could include safety regulations, work instructions, manuals, or other useful information. | |||
Under | |||
You decide for yourself in which departments an instruction should be displayed and whether it is mandatory or not. You can also divide the instructions into different categories so that they are presented logically on the page. | |||
< | <span id="Driftstopp"></span> | ||
== | ==Downtime== | ||
Downtime is a special type of task that is intended to be performed in the event that production, for example, comes to a standstill for one reason or another. It can be maintenance tasks that cannot be performed while production is running, or machine maintenance that can only be performed during a downtime. | |||
< | <span id="Ärenden"></span> | ||
== | ==Issues== | ||
From all pages, it is easy to access forms for reporting different types of issues. These can be of the type Error Reports, Improvement Suggestions, Risk Observations, Incidents and Accidents. | |||
Depending on the type, a form will open where you can enter text describing the case and attach images. | |||
The case ends up on the administration page where it can be taken care of and taken further with appropriate action, and as an email message that is sent to the person responsible for the department or the person designated as the case manager. | |||
==Leanboard== | ==Leanboard== | ||
On a leanboard, you can get an overview of, for example, how many assignments are completed, ongoing, or delayed. It is also possible to display error reports, accidents, and incidents in an overall and graphical way. It is possible to create leanboards yourself with certain given building blocks on the administration side. | |||
< | <span id="Uppdrag"></span> | ||
== | ==Assignments== | ||
When you click on a task from the task screen, it opens and detailed information about the task is displayed. A checklist can be linked to a task that contains a number of items that you can click on. It is also possible to add a number of input fields where you can fill in information that should be reported together with the task. | |||
<div lang="sv" dir="ltr" class="mw-content-ltr"> | <div lang="sv" dir="ltr" class="mw-content-ltr"> | ||
| Rad 108: | Rad 73: | ||
</div> | </div> | ||
It is possible to enter and attach images to notes when working on assignments. | |||
When you check a box on a checklist or type something into an input field or note, it is saved immediately. So you don't have to press a save button. | |||
A slideshow can show what you are expected to do on the assignment. Documents or links to more information can also be presented. | |||
Deviations can be reported to an assignment. From deviations, new assignments can then be created to address them. | |||
When you are finished with your assignment, you acknowledge it and indicate who has completed the assignment. If it is a scheduled assignment, the next assignment will be created based on the settings in the assignment definition for the current assignment. | |||
< | <span id="Administrationsskärmen"></span> | ||
= | =Administration screen= | ||
When creating assignments, there are a few things you need to set up first. There must be departments and areas, as well as personnel who will sign off on the assignments. If you have operations in different geographical locations and want to use the same department name, you can separate them by creating locations as a top level. A location can have one or more departments, where each department can have one or more areas. | |||
< | <span id="Allmänt"></span> | ||
== | ==In general== | ||
On the administration pages, the content is presented in lists in tables. These tables can be sorted by clicking on the header of the column you want to sort by. Click again to sort in reverse order. Some tables also have functions for exporting the content to Excel, copying or printing it. It is also possible to hide columns in some tables. | |||
<div lang="sv" dir="ltr" class="mw-content-ltr"> | <div lang="sv" dir="ltr" class="mw-content-ltr"> | ||
| Rad 148: | Rad 97: | ||
</div> | </div> | ||
It is also possible to choose how many results to display and the option to search in the current table. | |||
Buttons used to work with the content are as follows (Edit – Copy – Delete): | |||
<div lang="sv" dir="ltr" class="mw-content-ltr"> | <div lang="sv" dir="ltr" class="mw-content-ltr"> | ||
| Rad 160: | Rad 105: | ||
</div> | </div> | ||
Many of the settings in this section (departments, areas, personnel, etc.) are dependent on each other. Therefore, it may be necessary to update these in different rounds. For example, if you add a department but there are no areas, you must add areas and then go back to the department to select them. | |||
< | <span id="Platser"></span> | ||
== | ==Locations== | ||
A geographic location consists of only a name and the option to specify a person in charge. The locations are only used on the administration pages to distinguish departments, areas, assignments, etc. | |||
Only needed if you want to divide the departments into different geographical locations. A location can have one or more departments. Normally you only need to use locations if you want to name departments the same way across different sites. | |||
< | <span id="Avdelningar"></span> | ||
== | ==Departments== | ||
Each department is assigned staff who work in the department and who will be able to sign off on assignments. You also choose which areas will be eligible for the department. | |||
On the assignment screen, you can switch between the different departments that are assigned to the logged-in user. | |||
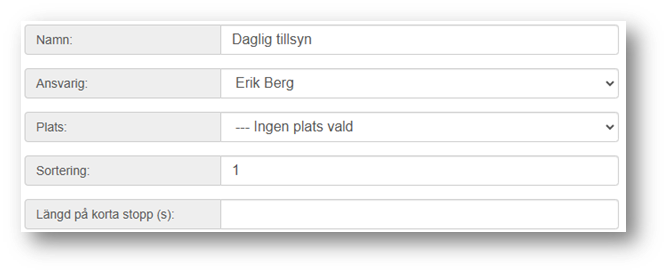
The first thing you specify for a department is what name the department should have. Then you specify who is responsible (from a list of system administrators) and check if you want to receive notifications for reported cases. | |||
<div lang="sv" dir="ltr" class="mw-content-ltr"> | <div lang="sv" dir="ltr" class="mw-content-ltr"> | ||
| Rad 196: | Rad 127: | ||
</div> | </div> | ||
For display on the mission screen, you can choose whether you want a two-column layout or whether each area should be displayed on its own row. | |||
You can also specify a sort order for the departments. This is the order in the list of departments that you can choose on the mission screen. If you do not specify one or if several departments have the same number, it will be sorted by name instead. | |||
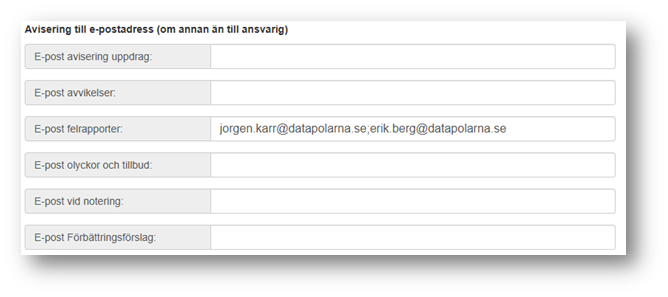
If you want to send notifications to someone other than the person responsible for the department, you can enter email addresses for selected types. If you want to send to multiple addresses, you can separate the email addresses with a semicolon. | |||
<div lang="sv" dir="ltr" class="mw-content-ltr"> | <div lang="sv" dir="ltr" class="mw-content-ltr"> | ||
| Rad 212: | Rad 137: | ||
</div> | </div> | ||
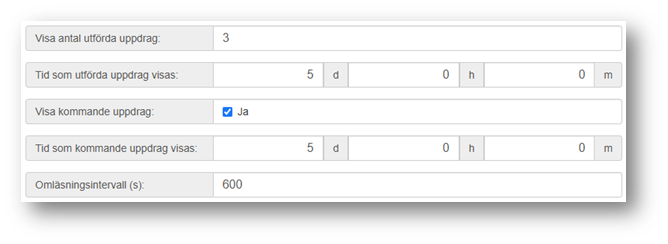
The assignments that are displayed on the assignments screen have a few different statuses depending on whether they are ongoing, delayed, upcoming, etc. and here you can decide how these should be displayed. | |||
<div lang="sv" dir="ltr" class="mw-content-ltr"> | <div lang="sv" dir="ltr" class="mw-content-ltr"> | ||
| Rad 220: | Rad 143: | ||
</div> | </div> | ||
The number of completed assignments are the green assignments that are acknowledged on the assignment screen. Here you can specify how many of these should be displayed at the same time. You can also set how long these should be displayed for. In the same way, you can choose whether to see upcoming assignments and how long before you see them. You can also set this on the assignment definition and then that will be the one that will apply. | |||
You can also set how often the assignment screen should automatically update. | |||
Then you choose which areas should be in the department and which personnel should be able to acknowledge assignments on the department's assignment screen. If you have not set up any areas or personnel, you must do this and then update the department again. | |||
It is also possible to choose which menu functions should be available on the mission screen for the selected department. Normally, all options are selected. | |||
< | <span id="Områden"></span> | ||
== | ==Areas== | ||
Areas are a way to further divide the department when planning assignments. You could imagine having a department for all vehicles and then each vehicle or vehicle type could be its own area. | |||
An area is a subgroup of a department. A department can therefore contain several areas. An area can belong to several departments. For example, you can imagine that there is a department for all vehicles and then each vehicle or vehicle type could be its own area. | |||
In the same way as for departments, you specify a name and who is responsible. | |||
<div lang="sv" dir="ltr" class="mw-content-ltr"> | <div lang="sv" dir="ltr" class="mw-content-ltr"> | ||
| Rad 256: | Rad 164: | ||
</div> | </div> | ||
It is possible to link an area to a geographical location, and then you will only be able to select the area in departments with the same location. | |||
The sort order can be used if you want to present the areas in a specific order, otherwise they are sorted by name. | |||
In areas, you can also choose which deviation groups should be available for deviation reporting. Deviation groups are created under the Deviations menu option. | |||
==Locations – Departments – Areas, an example== | |||
===Scenario 1=== | ===Scenario 1=== | ||
You only have operations at one location. Here you want to perform vehicle inspections on forklifts and wheel loaders. | |||
First, you create a department, Vehicles, and then two areas, Trucks and Wheel Loaders. | |||
When you create an assignment, you select a department and then areas linked to that department will be selected. | |||
===Scenario 2=== | ===Scenario 2=== | ||
The business is located in two different geographical locations (Location 1 and Location 2). At these locations, the company wants to perform vehicle inspections on forklifts and wheel loaders. | |||
In this case, you set up two locations, Location 1 and Location 2. Then you set up a Vehicle department at each location. So there will be two vehicle departments, but they are linked to their own location. In the same way, the Truck and Wheel Loader areas are set up. These are also linked to the location, which means that there will be a total of four areas. | |||
When you later create a mission and select a location, the departments of that location will become selectable. When you select a department, the areas of the department will become selectable. | |||
< | <span id="Roller"></span> | ||
== | ==Roles== | ||
On the assignment screen, you can group assignments either by area or by role. Personnel can belong to one or more roles. | |||
When creating an assignment, you can choose that only personnel within a certain role can acknowledge an assignment. | |||
A role can also be responsible for an assignment, and then everyone in the role will receive notifications unless the department has set something else. | |||
When editing a role, you select the people who should be included. | |||
< | <span id="Personal"></span> | ||
== | ==Personnel== | ||
Everyone who should be able to sign off on assignments is placed under personnel. A person can belong to one or more departments and be part of one or more roles. | |||
Enter name, email and select which departments the person will have access to. Location controls which departments appear in the list and is only used if you work with multiple geographic locations. | |||
Here you also choose which roles the person will belong to. | |||
Finally, you can enter a PIN code that the person will use to acknowledge instructions and assignments if they require it. | |||
< | <span id="Avvikelser"></span> | ||
== | ==Deviations== | ||
When you want to report a deviation on an assignment, you must select a deviation cause. These deviation causes are grouped into a deviation group that can then be linked to one or more areas. When you are then in an assignment and want to report a deviation, you can choose from the deviation causes that are linked to the current assignment through its area. | |||
For example, you can have a deviation group called "Staff shortage" that contains the deviation reasons "Illness", "Vacation", "Other". | |||
By grouping the deviations in this way, it is possible to create reports where you can see which causes create the most deviations, for example. | |||
< | <span id="Arbetsschema"></span> | ||
== | ==Work schedule== | ||
A work schedule is used to calculate working hours when scheduling an assignment. In the schedule, you enter times that are working hours and times that should not be working hours. This way, you can create assignments that only end up in working hours. If you have an assignment that needs to be completed after a certain number of working hours, the work schedule is also a way to calculate when the next assignment should be created. | |||
<div lang="sv" dir="ltr" class="mw-content-ltr"> | <div lang="sv" dir="ltr" class="mw-content-ltr"> | ||
| Rad 366: | Rad 226: | ||
</div> | </div> | ||
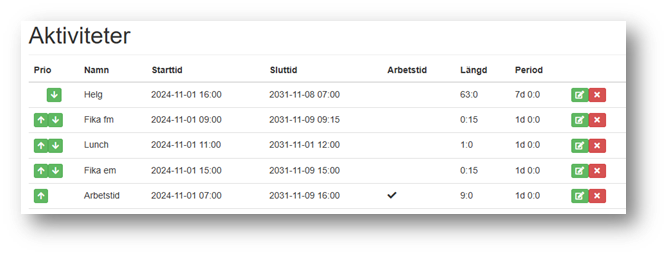
When editing a work schedule, you add one or more activities that have a given start time, duration, and interval. You also specify whether or not they should be counted as working time. The order of the activities determines their priority when working time is calculated. | |||
Each activity has a name and an optional description. You then specify when the activity should start (the first time) and how long we should continue to generate this activity in the future (so it has nothing to do with how long the activity itself is). | |||
The duration of the activity specifies how long it is and repeat specifies the interval at which the activity should be generated. Then you specify whether it should be working time or not. | |||
It is possible to create schedules in different ways, here is an example of how to create a simple daily schedule. | |||
<div lang="sv" dir="ltr" class="mw-content-ltr"> | <div lang="sv" dir="ltr" class="mw-content-ltr"> | ||
| Rad 386: | Rad 238: | ||
</div> | </div> | ||
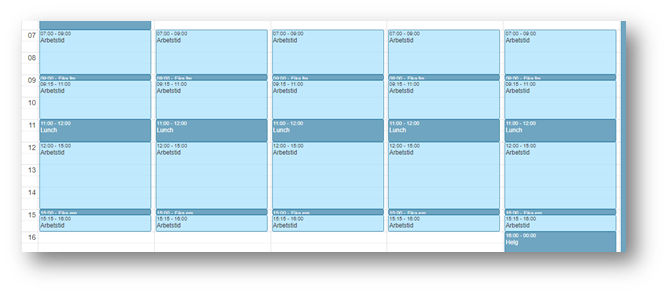
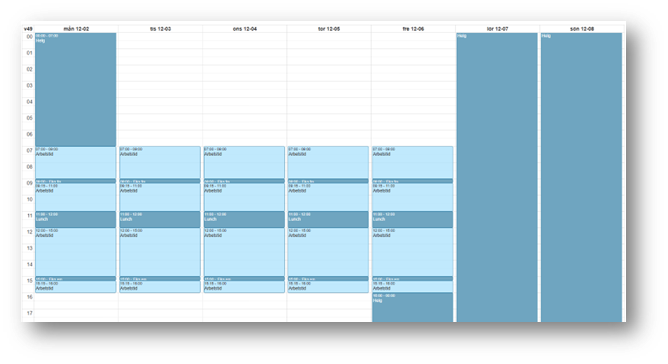
In this case, we have first added all the time that is not working time. The weekend starts on Friday at 4:00 PM and lasts for 63 hours until Monday at 7:00 AM. Then we have three breaks during the day and finally we have added working time between 7:00 AM and 4:00 PM. Since working time has the lowest priority, any breaks will remove working time during the day and the weekend. Here is what the schedule looks like based on these activities. | |||
<div lang="sv" dir="ltr" class="mw-content-ltr"> | <div lang="sv" dir="ltr" class="mw-content-ltr"> | ||
| Rad 394: | Rad 244: | ||
</div> | </div> | ||
The light blue fields are working hours while the dark blue ones are breaks/weekends. | |||
By using a work schedule when planning your scheduled tasks, you can ensure that tasks are only created during working hours and that no tasks are created when they should not be created. | |||
< | <span id="Checklistor"></span> | ||
== | ==Checklists== | ||
A checklist contains one or more items. The same checklist can be used on several different assignments. | |||
There are two different types of checklists: | |||
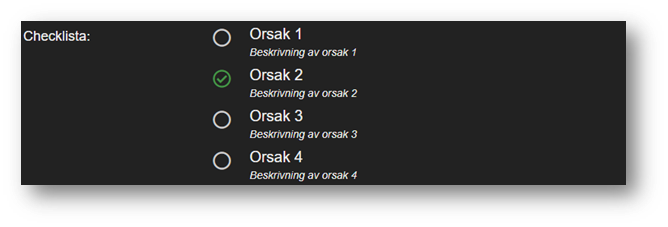
*'''Checkbox (multiple choice)'''<br>A point in the checklist can have three different statuses: not checked, checked ok, checked not ok.<br>When you click on a point on a checklist, it is marked with a green checkmark. If you click on the same point again, it is marked with a red line. This way you can see which points have been checked and which are ok and which are not ok.<br>[[File:SIDO_check.png]] | |||
*'''Checkbox ( | |||
*'''Radio (single choice)'''<br>Unlike checkbox, in the radio list you can only select one option.<br>[[File:SIDO_radio.png]] | |||
*'''Radio ( | |||
It is also possible to choose to make the checklist mandatory. This means that all items must be checked in order to be able to acknowledge the assignment. If you choose to make the checklist mandatory, it will apply to all assignments that use the checklist. | |||
< | <span id="Inmatningsmall"></span> | ||
== | ==Input template== | ||
If you want to collect data in connection with reporting on an assignment, you can create an input template with one or more input fields. In the same way as checklists, you can use one input template for multiple assignments. | |||
<div lang="sv" dir="ltr" class="mw-content-ltr"> | <div lang="sv" dir="ltr" class="mw-content-ltr"> | ||
| Rad 438: | Rad 270: | ||
</div> | </div> | ||
Here you can set one or more input fields to be mandatory. Then you must fill in something in these fields in order to acknowledge an assignment. This applies to all assignments that use the input template. | |||
< | <span id="Instruktionskategori"></span> | ||
== | ==Instruction Category== | ||
In the same way that you can use areas to divide assignments in a department, you can use instruction categories to divide instructions into different categories. | |||
< | <span id="Uppdragsdefinitioner"></span> | ||
== | ==Assignment Definitions== | ||
You could say that an assignment definition is a template that is used to create tasks on the assignment screen. In addition to a description of the task, the task definition also contains rules for where it should be displayed, who can acknowledge it, when and how often it should be created, etc. | |||
The first thing you do is choose the assignment type: | |||
*'''Downtime'''<br>Assignments that end up under the Downtime tab on the assignment screen. These tasks are intended to be carried out if an downtime occurs. This allows you to see if there is anything you can do during the downtime. | |||
*''' | *'''One-time job'''<br>A task that will only be done once. | ||
*''' | *'''Instruction/routine'''<br>Tasks that will be displayed on the task screen under Instructions. | ||
*''' | *'''Scheduled'''<br>Tasks that will be carried out at regular intervals. When a scheduled task is acknowledged, a new task will be created according to the rules set on the task definition. | ||
*''' | |||
Depending on the task type, there are different things you can specify on the task definition. Here we will show an example of a scheduled task and an instruction/routine. | |||
< | <span id="Schemalagda_uppdrag"></span> | ||
=== | ===Scheduled Assignments=== | ||
<div lang="sv" dir="ltr" class="mw-content-ltr"> | <div lang="sv" dir="ltr" class="mw-content-ltr"> | ||
| Rad 481: | Rad 298: | ||
</div> | </div> | ||
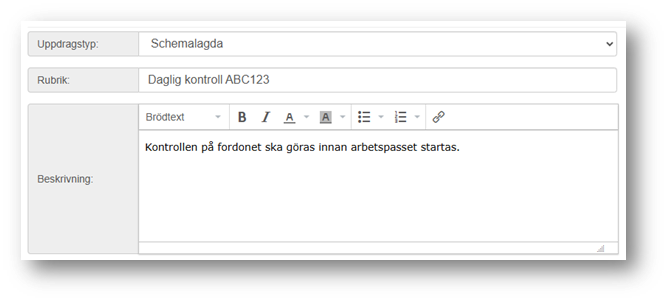
Select the task type "Scheduled". | |||
The title is what will also appear on the buttons on the mission screen. Try to keep the title as short as possible. | |||
The description is displayed when you open the assignment. | |||
<div lang="sv" dir="ltr" class="mw-content-ltr"> | <div lang="sv" dir="ltr" class="mw-content-ltr"> | ||
| Rad 497: | Rad 308: | ||
</div> | </div> | ||
The next step is to choose whether you want a checklist and/or input fields. | |||
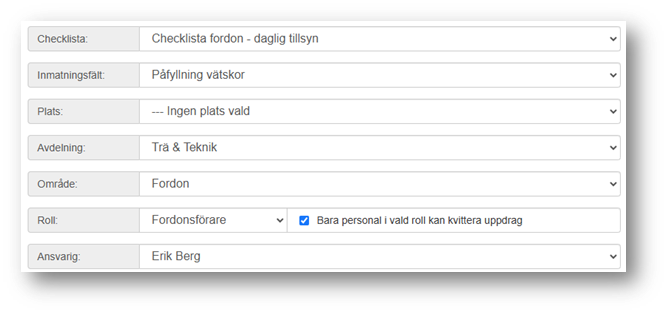
Then you choose which department and area the assignment should appear in. If you want to use the same assignment in multiple departments, you must create a copy of the assignment definition and select a different department in the new one. This means that you can only create one assignment in one department per assignment definition. | |||
To be able to present the assignments per role, you must select a role and choose whether everyone in the department should be able to acknowledge the assignment or whether only personnel with the selected role should be able to acknowledge the assignment. | |||
<div lang="sv" dir="ltr" class="mw-content-ltr"> | <div lang="sv" dir="ltr" class="mw-content-ltr"> | ||
| Rad 513: | Rad 318: | ||
</div> | </div> | ||
If you want to be more certain that the right person acknowledges an assignment, you can choose to have the assignment require a PIN code upon acknowledgement. | |||
If the assignment is personal, it will appear as its own area on the assignment screen. It is still possible for others to acknowledge the assignment. | |||
You can also choose whether a substitute should be allowed to sign off on the assignment, in which case you can enter the name of the person signing off in connection with the receipt. | |||
It is also possible to request a note or image/photo when confirming an assignment. | |||
The next step is to set when and how often a task should be created. | |||
< | <span id="Exempel_1_–_Inget_schema_från_starttid"></span> | ||
=== | ===Example 1 – No schedule from start time=== | ||
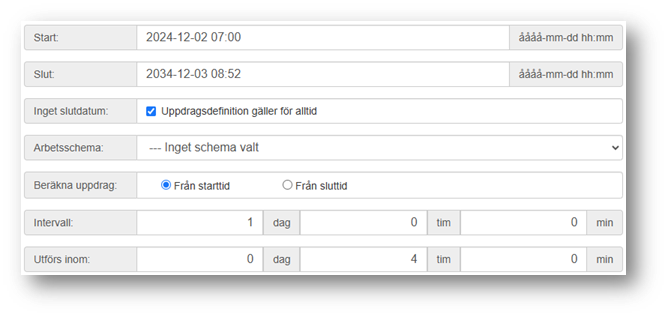
The start time is the time when the first task will be created. The end time is how long we will continue to generate tasks. How often a task will be created and how long you have to complete a task are controlled by the settings under “Interval” and “Executed within”. | |||
If you check the box that says the assignment definition should apply forever, the end date will be set ten years in the future every time you save the assignment definition. | |||
<div lang="sv" dir="ltr" class="mw-content-ltr"> | <div lang="sv" dir="ltr" class="mw-content-ltr"> | ||
| Rad 549: | Rad 339: | ||
</div> | </div> | ||
Starting at 07:00, December 2, 2024, create a quest that I have 4 hours to complete (will turn red on the quest screen after 11:00. If we acknowledge the quest at 10:00 on December 2, the next quest will be created in 1 day from the start time, i.e. at 07:00 on December 3. | |||
< | <span id="Exempel_2_–_Inget_schema_från_sluttid"></span> | ||
=== | ===Example 2 – No schedule from end time=== | ||
If we had instead chosen to check "From end time" in example 1, the next assignment would have been created one day after the time it was acknowledged, i.e. at 10:00 on December 3rd. | |||
< | <span id="Exempel_3_–_Intervall_enligt_schema"></span> | ||
=== | ===Example 3 – Scheduled Interval=== | ||
<div lang="sv" dir="ltr" class="mw-content-ltr"> | <div lang="sv" dir="ltr" class="mw-content-ltr"> | ||
| Rad 569: | Rad 353: | ||
</div> | </div> | ||
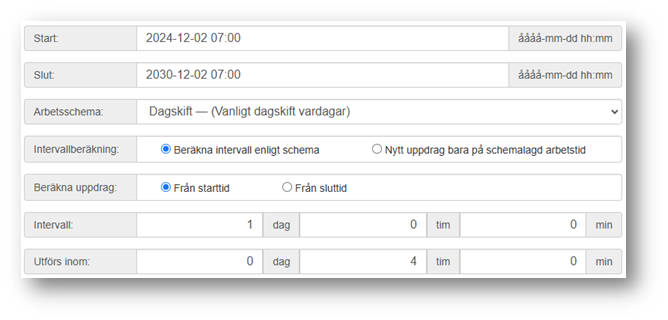
Still the same start time as in the previous examples. The difference here is that when you acknowledge the assignment, the next assignment will be created 24 working hours according to the work schedule after the start time of 07:00. If the assignment is acknowledged at 10:00 on December 2, 2024, the next assignment will be created at 08:30 on December 5 because we have 7.5 hours of working time according to the schedule. When this assignment is created, the next one will be counted from 08:30 on December 5 and 24 working hours forward. | |||
In the same way as in example 2, the second assignment would have been created 24 working hours after 10:00 AM if we had ticked off the end time instead. | |||
< | <span id="Exempel_4_–_Nytt_uppdrag_bara_på_schemalagd_arbetstid"></span> | ||
=== | ===Example 4 – New assignment only during scheduled working hours=== | ||
If this choice is made, instead of calculating the next assignment after working hours, calendar time will be used, but only if the assignment falls within a scheduled working time. | |||
If we use the same times as in the previous example, the next tasks if acknowledged every day will be created on December 3 at 07:00, then December 4, December 5, December 6. However, the task acknowledged on December 6 will generate a task that is created on December 9 because the 7th and 8th are on the weekend when there are no working hours. | |||
< | <span id="Aviseringar"></span> | ||
=== | ===Notifications=== | ||
<div lang="sv" dir="ltr" class="mw-content-ltr"> | <div lang="sv" dir="ltr" class="mw-content-ltr"> | ||
| Rad 597: | Rad 371: | ||
</div> | </div> | ||
The next step is to decide whether you should be able to report deviations related to the assignment. The deviations you can choose from are defined by the area that is selected. | |||
You can also set whether an email should be sent to the person responsible (either for the assignment or for the department) and for which activity. | |||
< | <span id="Visning"></span> | ||
=== | ===Display=== | ||
<div lang="sv" dir="ltr" class="mw-content-ltr"> | <div lang="sv" dir="ltr" class="mw-content-ltr"> | ||
| Rad 613: | Rad 382: | ||
</div> | </div> | ||
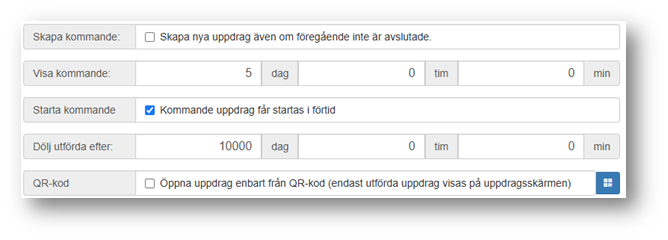
< | Normally a new task is created when a task is acknowledged, but it is possible to choose to create a new task even if the previous task is not completed. However, this should be used with great caution as there is a risk of creating a large number of tasks. | ||
</ | You can also set how far in the future an upcoming mission should be displayed and how long a completed mission should be displayed. If it is okay to start a mission early, you can also choose. | ||
All assignments automatically receive a QR code that you can scan with your phone to open the assignment. | |||
<span id="QR-kod"></span> | |||
===QR-code=== | |||
If you check the box "... only from QR code", the assignment will not be displayed on the assignment screen but will only be accessible from the QR code. | |||
If you check the box "Activate assignment with QR code", the assignment will be displayed, but you must scan the QR code for the assignment in order to be able to acknowledge it. | |||
In the list of assignment definitions on the administration page, you can print QR codes for all assignment definitions by clicking on the QR symbol in the row for the assignment definition you want to print. When the user scans that QR code, they will be taken to the active assignment that was created from that assignment definition. | |||
< | <span id="Instruktion/Rutin"></span> | ||
== | ==Instruction/Routine== | ||
An instruction is similar to a regular assignment, but has a few different choices. | |||
Just like with a scheduled task, the title is what will be displayed on the button and the description is displayed when you go in and read the instructions. | |||
<div lang="sv" dir="ltr" class="mw-content-ltr"> | <div lang="sv" dir="ltr" class="mw-content-ltr"> | ||
| Rad 645: | Rad 408: | ||
</div> | </div> | ||
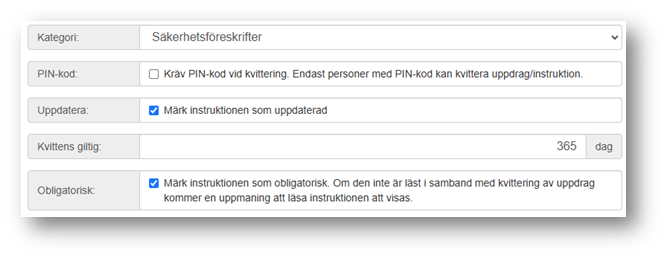
The category works in much the same way as areas, it is a way to categorize the instructions and group them on the mission screen. | |||
You can choose whether you are required to enter a PIN code when making a receipt. | |||
If you check the box "Mark the instruction as updated", everyone who has read and acknowledged the instruction previously will have to do so again. This will also happen if the acknowledgement is older than the specified validity period. | |||
If you click that the instruction is mandatory, you will receive a reminder if you acknowledge an assignment and there are unread instructions in that department. | |||
<div lang="sv" dir="ltr" class="mw-content-ltr"> | <div lang="sv" dir="ltr" class="mw-content-ltr"> | ||
| Rad 665: | Rad 420: | ||
</div> | </div> | ||
< | Unlike scheduled assignments, you can select multiple departments if the instruction applies to more than one department. Likewise, one or more roles can be selected, which means that the instruction is only available to the selected roles. | ||
</ | <span id="Hantering_av_Felrapporter,_Tillbud,_Olyckor,_m.fl."></span> | ||
==Management of Error Reports, Incidents, Accidents, etc.== | |||
All types of reported issues, whether they are deviations, error reports, improvement suggestions, accidents, risk observations or incidents, are handled in much the same way. | |||
In each list you can see the reported cases. When a case has been received, the idea is that the person logged in as an administrator should acknowledge the case as proof that they have read it and done what is needed to handle it. | |||
By clicking on the information button on each case, you can read the details and create one or more one-time assignments with the purpose of handling the reported case. | |||
< | <span id="Systemanvändare"></span> | ||
==System User== | |||
</ | |||
It is easy to confuse system users with personnel who are added to the system, but there are some clear differences. | |||
The system user is the one who logs into the system, while the staff are the ones who acknowledge assignments. So you can have a common user for a department or location that is used when logging in, and the staff connected to the department are the ones who acknowledge assignments. | |||
The system user can be assigned a role that controls what is available after logging in. The following roles are available: | |||
< | *'''Administrator'''<br>Accesses both the task screen and the administration pages. Can create tasks, add personnel and departments, etc. and add more system users for their own organization. An administrator has access to all departments and locations associated with the organization. | ||
*'''Administration (read-only)'''<br>Accesses the quest screen and administration pages, but cannot make changes to the administration pages. | |||
*''' | |||
<div lang="sv" dir="ltr" class="mw-content-ltr"> | <div lang="sv" dir="ltr" class="mw-content-ltr"> | ||
*'''Administration ( | *'''Administration (begränsad)'''<br>Kommer åt uppdragsskärmen och administrationssidorna förutom inrapporterade ärenden (avvikelser, felrapporter, olyckor, tillbud och förbättringsförslag) | ||
</div> | </div> | ||
*'''Administration (acknowledgement)'''<br>Accesses the assignment screen and reported deviations, error reports, accidents, incidents and improvement suggestions on the administration page and can acknowledge these. | |||
*'''Administration ( | |||
*'''Administrator (location)'''<br>Administrator who can only access the departments associated with the administrator's location. | |||
*''' | |||
*'''Display'''<br>Only accesses the mission screen. | |||
*'''Display'''<br> | |||
*'''Display (read-only)'''<br>Only accesses the quest screen and can read quests, but cannot acknowledge quests. | |||
*'''Display ( | |||
*'''Display (extended rights)'''<br>Like the display user but can also create assignments from reported deviations. | |||
*'''Display ( | |||
When you create a system user, you assign them a location (if one exists), a starting department (the default department for the task screen), and which departments the user should access on the task screen. | |||
Remember that if you add a department, you must update all system users who will have access to that department so that the department becomes selectable. After such a change, you must log out and then log in again for the department to become selectable. | |||
Nuvarande version från 13 maj 2025 kl. 11.58
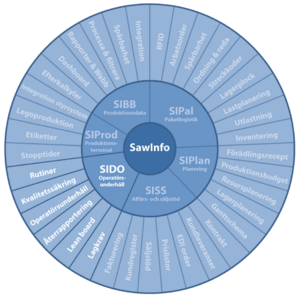
SIDO is a digital task display that is part of SawInfo.
Some key features:
- All types of scheduled tasks.
- Easy to use
- Cloud-based
- Error/incident reporting
- Instructions/routines
SIDO can be run on computers, mobile phones and tablets. No installation is required as everything runs in the browser.
Assignments screen
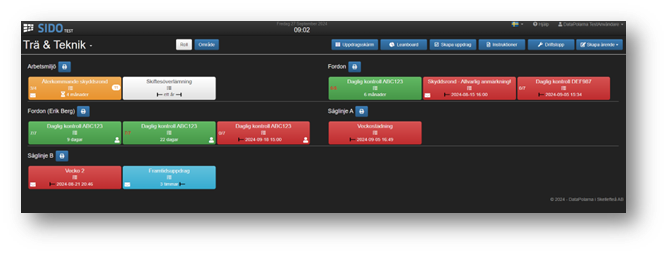
The assignments screen displays the assignments that are current for the selected department.
The assignments screen is divided into departments and areas. The missions have different colors depending on the status of the mission.
- Green
Completed and acknowledged assignment - White
Assignments that are open to work on. These are within a time frame that you want the assignment to be completed within. - yellow
Ongoing assignments - Red
Delayed assignments. These should have already been completed but are delayed for one reason or another. - Blue
Assignments that are planned to start in the future but where work cannot begin yet.
How long and how many completed (green) assignments are displayed and how far into the future an upcoming assignment (blue) should be displayed can be set generally for a department or individually for an assignment.
If you have scheduled a task to be done at certain intervals, the next task will be created when you acknowledge the task.
There are also individual assignments (one-time assignments) that only need to be done once and will therefore not create any new assignments.
Instructions
Under instructions, you can collect different types of information that you want your staff to have access to. This could include safety regulations, work instructions, manuals, or other useful information.
You decide for yourself in which departments an instruction should be displayed and whether it is mandatory or not. You can also divide the instructions into different categories so that they are presented logically on the page.
Downtime
Downtime is a special type of task that is intended to be performed in the event that production, for example, comes to a standstill for one reason or another. It can be maintenance tasks that cannot be performed while production is running, or machine maintenance that can only be performed during a downtime.
Issues
From all pages, it is easy to access forms for reporting different types of issues. These can be of the type Error Reports, Improvement Suggestions, Risk Observations, Incidents and Accidents.
Depending on the type, a form will open where you can enter text describing the case and attach images.
The case ends up on the administration page where it can be taken care of and taken further with appropriate action, and as an email message that is sent to the person responsible for the department or the person designated as the case manager.
Leanboard
On a leanboard, you can get an overview of, for example, how many assignments are completed, ongoing, or delayed. It is also possible to display error reports, accidents, and incidents in an overall and graphical way. It is possible to create leanboards yourself with certain given building blocks on the administration side.
Assignments
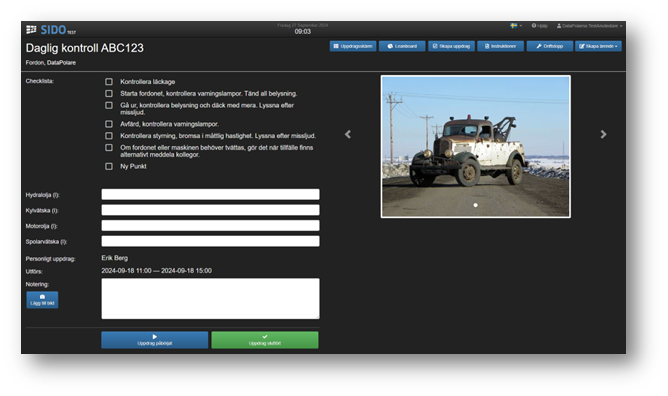
When you click on a task from the task screen, it opens and detailed information about the task is displayed. A checklist can be linked to a task that contains a number of items that you can click on. It is also possible to add a number of input fields where you can fill in information that should be reported together with the task.
It is possible to enter and attach images to notes when working on assignments.
When you check a box on a checklist or type something into an input field or note, it is saved immediately. So you don't have to press a save button.
A slideshow can show what you are expected to do on the assignment. Documents or links to more information can also be presented.
Deviations can be reported to an assignment. From deviations, new assignments can then be created to address them.
When you are finished with your assignment, you acknowledge it and indicate who has completed the assignment. If it is a scheduled assignment, the next assignment will be created based on the settings in the assignment definition for the current assignment.
Administration screen
When creating assignments, there are a few things you need to set up first. There must be departments and areas, as well as personnel who will sign off on the assignments. If you have operations in different geographical locations and want to use the same department name, you can separate them by creating locations as a top level. A location can have one or more departments, where each department can have one or more areas.
In general
On the administration pages, the content is presented in lists in tables. These tables can be sorted by clicking on the header of the column you want to sort by. Click again to sort in reverse order. Some tables also have functions for exporting the content to Excel, copying or printing it. It is also possible to hide columns in some tables.
It is also possible to choose how many results to display and the option to search in the current table.
Buttons used to work with the content are as follows (Edit – Copy – Delete):
Many of the settings in this section (departments, areas, personnel, etc.) are dependent on each other. Therefore, it may be necessary to update these in different rounds. For example, if you add a department but there are no areas, you must add areas and then go back to the department to select them.
Locations
A geographic location consists of only a name and the option to specify a person in charge. The locations are only used on the administration pages to distinguish departments, areas, assignments, etc.
Only needed if you want to divide the departments into different geographical locations. A location can have one or more departments. Normally you only need to use locations if you want to name departments the same way across different sites.
Departments
Each department is assigned staff who work in the department and who will be able to sign off on assignments. You also choose which areas will be eligible for the department.
On the assignment screen, you can switch between the different departments that are assigned to the logged-in user.
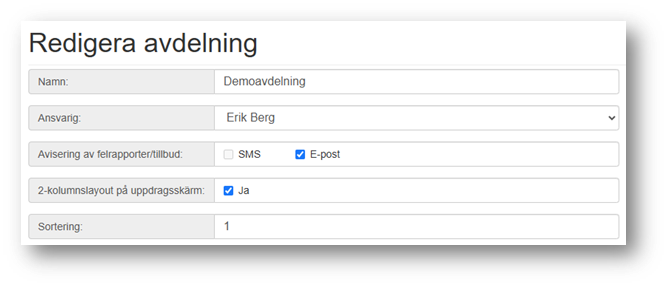
The first thing you specify for a department is what name the department should have. Then you specify who is responsible (from a list of system administrators) and check if you want to receive notifications for reported cases.
For display on the mission screen, you can choose whether you want a two-column layout or whether each area should be displayed on its own row.
You can also specify a sort order for the departments. This is the order in the list of departments that you can choose on the mission screen. If you do not specify one or if several departments have the same number, it will be sorted by name instead.
If you want to send notifications to someone other than the person responsible for the department, you can enter email addresses for selected types. If you want to send to multiple addresses, you can separate the email addresses with a semicolon.
The assignments that are displayed on the assignments screen have a few different statuses depending on whether they are ongoing, delayed, upcoming, etc. and here you can decide how these should be displayed.
The number of completed assignments are the green assignments that are acknowledged on the assignment screen. Here you can specify how many of these should be displayed at the same time. You can also set how long these should be displayed for. In the same way, you can choose whether to see upcoming assignments and how long before you see them. You can also set this on the assignment definition and then that will be the one that will apply.
You can also set how often the assignment screen should automatically update.
Then you choose which areas should be in the department and which personnel should be able to acknowledge assignments on the department's assignment screen. If you have not set up any areas or personnel, you must do this and then update the department again.
It is also possible to choose which menu functions should be available on the mission screen for the selected department. Normally, all options are selected.
Areas
Areas are a way to further divide the department when planning assignments. You could imagine having a department for all vehicles and then each vehicle or vehicle type could be its own area.
An area is a subgroup of a department. A department can therefore contain several areas. An area can belong to several departments. For example, you can imagine that there is a department for all vehicles and then each vehicle or vehicle type could be its own area.
In the same way as for departments, you specify a name and who is responsible.
It is possible to link an area to a geographical location, and then you will only be able to select the area in departments with the same location.
The sort order can be used if you want to present the areas in a specific order, otherwise they are sorted by name.
In areas, you can also choose which deviation groups should be available for deviation reporting. Deviation groups are created under the Deviations menu option.
Locations – Departments – Areas, an example
Scenario 1
You only have operations at one location. Here you want to perform vehicle inspections on forklifts and wheel loaders.
First, you create a department, Vehicles, and then two areas, Trucks and Wheel Loaders.
When you create an assignment, you select a department and then areas linked to that department will be selected.
Scenario 2
The business is located in two different geographical locations (Location 1 and Location 2). At these locations, the company wants to perform vehicle inspections on forklifts and wheel loaders.
In this case, you set up two locations, Location 1 and Location 2. Then you set up a Vehicle department at each location. So there will be two vehicle departments, but they are linked to their own location. In the same way, the Truck and Wheel Loader areas are set up. These are also linked to the location, which means that there will be a total of four areas.
When you later create a mission and select a location, the departments of that location will become selectable. When you select a department, the areas of the department will become selectable.
Roles
On the assignment screen, you can group assignments either by area or by role. Personnel can belong to one or more roles.
When creating an assignment, you can choose that only personnel within a certain role can acknowledge an assignment.
A role can also be responsible for an assignment, and then everyone in the role will receive notifications unless the department has set something else.
When editing a role, you select the people who should be included.
Personnel
Everyone who should be able to sign off on assignments is placed under personnel. A person can belong to one or more departments and be part of one or more roles.
Enter name, email and select which departments the person will have access to. Location controls which departments appear in the list and is only used if you work with multiple geographic locations.
Here you also choose which roles the person will belong to.
Finally, you can enter a PIN code that the person will use to acknowledge instructions and assignments if they require it.
Deviations
When you want to report a deviation on an assignment, you must select a deviation cause. These deviation causes are grouped into a deviation group that can then be linked to one or more areas. When you are then in an assignment and want to report a deviation, you can choose from the deviation causes that are linked to the current assignment through its area.
For example, you can have a deviation group called "Staff shortage" that contains the deviation reasons "Illness", "Vacation", "Other".
By grouping the deviations in this way, it is possible to create reports where you can see which causes create the most deviations, for example.
Work schedule
A work schedule is used to calculate working hours when scheduling an assignment. In the schedule, you enter times that are working hours and times that should not be working hours. This way, you can create assignments that only end up in working hours. If you have an assignment that needs to be completed after a certain number of working hours, the work schedule is also a way to calculate when the next assignment should be created.
When editing a work schedule, you add one or more activities that have a given start time, duration, and interval. You also specify whether or not they should be counted as working time. The order of the activities determines their priority when working time is calculated.
Each activity has a name and an optional description. You then specify when the activity should start (the first time) and how long we should continue to generate this activity in the future (so it has nothing to do with how long the activity itself is).
The duration of the activity specifies how long it is and repeat specifies the interval at which the activity should be generated. Then you specify whether it should be working time or not.
It is possible to create schedules in different ways, here is an example of how to create a simple daily schedule.
In this case, we have first added all the time that is not working time. The weekend starts on Friday at 4:00 PM and lasts for 63 hours until Monday at 7:00 AM. Then we have three breaks during the day and finally we have added working time between 7:00 AM and 4:00 PM. Since working time has the lowest priority, any breaks will remove working time during the day and the weekend. Here is what the schedule looks like based on these activities.
The light blue fields are working hours while the dark blue ones are breaks/weekends.
By using a work schedule when planning your scheduled tasks, you can ensure that tasks are only created during working hours and that no tasks are created when they should not be created.
Checklists
A checklist contains one or more items. The same checklist can be used on several different assignments.
There are two different types of checklists:
- Checkbox (multiple choice)
A point in the checklist can have three different statuses: not checked, checked ok, checked not ok.
When you click on a point on a checklist, it is marked with a green checkmark. If you click on the same point again, it is marked with a red line. This way you can see which points have been checked and which are ok and which are not ok.
It is also possible to choose to make the checklist mandatory. This means that all items must be checked in order to be able to acknowledge the assignment. If you choose to make the checklist mandatory, it will apply to all assignments that use the checklist.
Input template
If you want to collect data in connection with reporting on an assignment, you can create an input template with one or more input fields. In the same way as checklists, you can use one input template for multiple assignments.
Here you can set one or more input fields to be mandatory. Then you must fill in something in these fields in order to acknowledge an assignment. This applies to all assignments that use the input template.
Instruction Category
In the same way that you can use areas to divide assignments in a department, you can use instruction categories to divide instructions into different categories.
Assignment Definitions
You could say that an assignment definition is a template that is used to create tasks on the assignment screen. In addition to a description of the task, the task definition also contains rules for where it should be displayed, who can acknowledge it, when and how often it should be created, etc.
The first thing you do is choose the assignment type:
- Downtime
Assignments that end up under the Downtime tab on the assignment screen. These tasks are intended to be carried out if an downtime occurs. This allows you to see if there is anything you can do during the downtime. - One-time job
A task that will only be done once. - Instruction/routine
Tasks that will be displayed on the task screen under Instructions. - Scheduled
Tasks that will be carried out at regular intervals. When a scheduled task is acknowledged, a new task will be created according to the rules set on the task definition.
Depending on the task type, there are different things you can specify on the task definition. Here we will show an example of a scheduled task and an instruction/routine.
Scheduled Assignments
Select the task type "Scheduled".
The title is what will also appear on the buttons on the mission screen. Try to keep the title as short as possible.
The description is displayed when you open the assignment.
The next step is to choose whether you want a checklist and/or input fields.
Then you choose which department and area the assignment should appear in. If you want to use the same assignment in multiple departments, you must create a copy of the assignment definition and select a different department in the new one. This means that you can only create one assignment in one department per assignment definition.
To be able to present the assignments per role, you must select a role and choose whether everyone in the department should be able to acknowledge the assignment or whether only personnel with the selected role should be able to acknowledge the assignment.
If you want to be more certain that the right person acknowledges an assignment, you can choose to have the assignment require a PIN code upon acknowledgement.
If the assignment is personal, it will appear as its own area on the assignment screen. It is still possible for others to acknowledge the assignment.
You can also choose whether a substitute should be allowed to sign off on the assignment, in which case you can enter the name of the person signing off in connection with the receipt.
It is also possible to request a note or image/photo when confirming an assignment.
The next step is to set when and how often a task should be created.
Example 1 – No schedule from start time
The start time is the time when the first task will be created. The end time is how long we will continue to generate tasks. How often a task will be created and how long you have to complete a task are controlled by the settings under “Interval” and “Executed within”.
If you check the box that says the assignment definition should apply forever, the end date will be set ten years in the future every time you save the assignment definition.
Starting at 07:00, December 2, 2024, create a quest that I have 4 hours to complete (will turn red on the quest screen after 11:00. If we acknowledge the quest at 10:00 on December 2, the next quest will be created in 1 day from the start time, i.e. at 07:00 on December 3.
Example 2 – No schedule from end time
If we had instead chosen to check "From end time" in example 1, the next assignment would have been created one day after the time it was acknowledged, i.e. at 10:00 on December 3rd.
Example 3 – Scheduled Interval
Still the same start time as in the previous examples. The difference here is that when you acknowledge the assignment, the next assignment will be created 24 working hours according to the work schedule after the start time of 07:00. If the assignment is acknowledged at 10:00 on December 2, 2024, the next assignment will be created at 08:30 on December 5 because we have 7.5 hours of working time according to the schedule. When this assignment is created, the next one will be counted from 08:30 on December 5 and 24 working hours forward.
In the same way as in example 2, the second assignment would have been created 24 working hours after 10:00 AM if we had ticked off the end time instead.
Example 4 – New assignment only during scheduled working hours
If this choice is made, instead of calculating the next assignment after working hours, calendar time will be used, but only if the assignment falls within a scheduled working time.
If we use the same times as in the previous example, the next tasks if acknowledged every day will be created on December 3 at 07:00, then December 4, December 5, December 6. However, the task acknowledged on December 6 will generate a task that is created on December 9 because the 7th and 8th are on the weekend when there are no working hours.
Notifications
The next step is to decide whether you should be able to report deviations related to the assignment. The deviations you can choose from are defined by the area that is selected.
You can also set whether an email should be sent to the person responsible (either for the assignment or for the department) and for which activity.
Display
Normally a new task is created when a task is acknowledged, but it is possible to choose to create a new task even if the previous task is not completed. However, this should be used with great caution as there is a risk of creating a large number of tasks.
You can also set how far in the future an upcoming mission should be displayed and how long a completed mission should be displayed. If it is okay to start a mission early, you can also choose.
All assignments automatically receive a QR code that you can scan with your phone to open the assignment.
QR-code
If you check the box "... only from QR code", the assignment will not be displayed on the assignment screen but will only be accessible from the QR code.
If you check the box "Activate assignment with QR code", the assignment will be displayed, but you must scan the QR code for the assignment in order to be able to acknowledge it.
In the list of assignment definitions on the administration page, you can print QR codes for all assignment definitions by clicking on the QR symbol in the row for the assignment definition you want to print. When the user scans that QR code, they will be taken to the active assignment that was created from that assignment definition.
Instruction/Routine
An instruction is similar to a regular assignment, but has a few different choices.
Just like with a scheduled task, the title is what will be displayed on the button and the description is displayed when you go in and read the instructions.
The category works in much the same way as areas, it is a way to categorize the instructions and group them on the mission screen.
You can choose whether you are required to enter a PIN code when making a receipt.
If you check the box "Mark the instruction as updated", everyone who has read and acknowledged the instruction previously will have to do so again. This will also happen if the acknowledgement is older than the specified validity period.
If you click that the instruction is mandatory, you will receive a reminder if you acknowledge an assignment and there are unread instructions in that department.
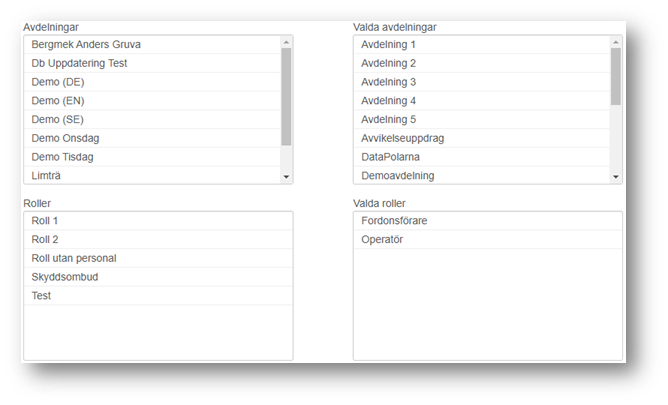
Unlike scheduled assignments, you can select multiple departments if the instruction applies to more than one department. Likewise, one or more roles can be selected, which means that the instruction is only available to the selected roles.
Management of Error Reports, Incidents, Accidents, etc.
All types of reported issues, whether they are deviations, error reports, improvement suggestions, accidents, risk observations or incidents, are handled in much the same way.
In each list you can see the reported cases. When a case has been received, the idea is that the person logged in as an administrator should acknowledge the case as proof that they have read it and done what is needed to handle it.
By clicking on the information button on each case, you can read the details and create one or more one-time assignments with the purpose of handling the reported case.
System User
It is easy to confuse system users with personnel who are added to the system, but there are some clear differences.
The system user is the one who logs into the system, while the staff are the ones who acknowledge assignments. So you can have a common user for a department or location that is used when logging in, and the staff connected to the department are the ones who acknowledge assignments.
The system user can be assigned a role that controls what is available after logging in. The following roles are available:
- Administrator
Accesses both the task screen and the administration pages. Can create tasks, add personnel and departments, etc. and add more system users for their own organization. An administrator has access to all departments and locations associated with the organization.
- Administration (read-only)
Accesses the quest screen and administration pages, but cannot make changes to the administration pages.
- Administration (begränsad)
Kommer åt uppdragsskärmen och administrationssidorna förutom inrapporterade ärenden (avvikelser, felrapporter, olyckor, tillbud och förbättringsförslag)
- Administration (acknowledgement)
Accesses the assignment screen and reported deviations, error reports, accidents, incidents and improvement suggestions on the administration page and can acknowledge these.
- Administrator (location)
Administrator who can only access the departments associated with the administrator's location.
- Display
Only accesses the mission screen.
- Display (read-only)
Only accesses the quest screen and can read quests, but cannot acknowledge quests.
- Display (extended rights)
Like the display user but can also create assignments from reported deviations.
When you create a system user, you assign them a location (if one exists), a starting department (the default department for the task screen), and which departments the user should access on the task screen.
Remember that if you add a department, you must update all system users who will have access to that department so that the department becomes selectable. After such a change, you must log out and then log in again for the department to become selectable.
