SIDO Råmåttsmätning/en: Skillnad mellan sidversioner
Hoppa till navigering
Hoppa till sök
Erik (diskussion | bidrag) Skapade sidan med 'SIDO measurement of dimensions' |
Erik (diskussion | bidrag) Ingen redigeringssammanfattning |
||
| (13 mellanliggande sidversioner av samma användare visas inte) | |||
| Rad 1: | Rad 1: | ||
Instructions for installing the caliper from Mahr and SIDO board measurement service. | |||
= Installation | = Installation of MarCom = | ||
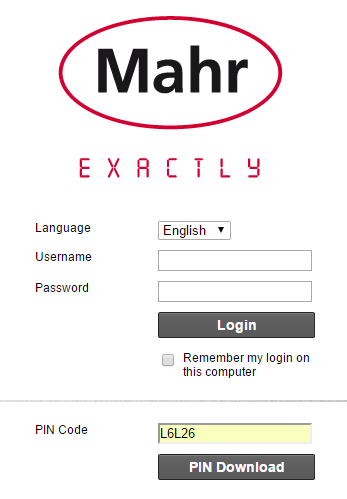
# | # Goto '''https://dam.mahr.com'''<br />[[Fil:Mahr1.png]] | ||
# PIN-Code: '''L6L26''' | # PIN-Code: '''L6L26''' | ||
# | # Click '''”PIN-Download”''' followed by '''”Download”''' on next page. | ||
# | # Download will start. The installation file is rather big, almost 100 Mb. | ||
# | # When the download is complete, go to the directory where the file was saved and unpack the file '''”MarConnect--MarCom_Standard--MarCom_5.1-2--SW—Standard.zip”'''. | ||
# | # Execute '''”S e t u p-MarCom.exe”'''. | ||
# | # Follow all instructions and install all necessary drivers. | ||
# MarCom | # The MarCom program starts automatically when the installation is complete. If it is not started, click on the MarCom icon on the desktop. | ||
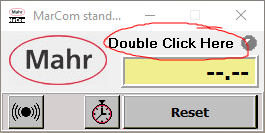
# | # Double click on the text '''”Double Click Here”'''<br />[[Fil:Mahr2.png]] | ||
# | # Connect the USB-stick to the computer. | ||
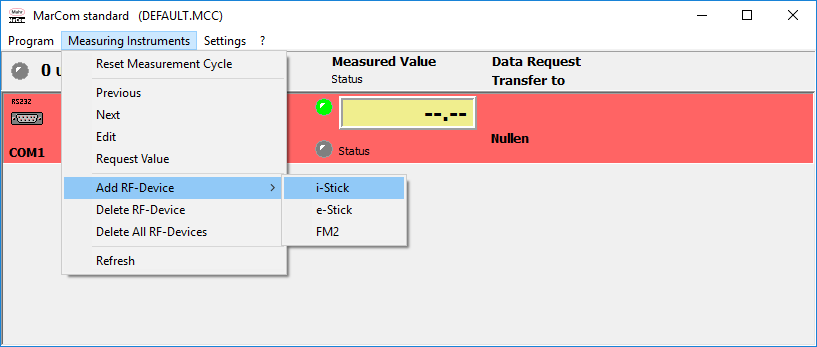
# | # Add measuring instrument - '''”i-Stick”'''.<br />[[Fil:Mahr3.png]] | ||
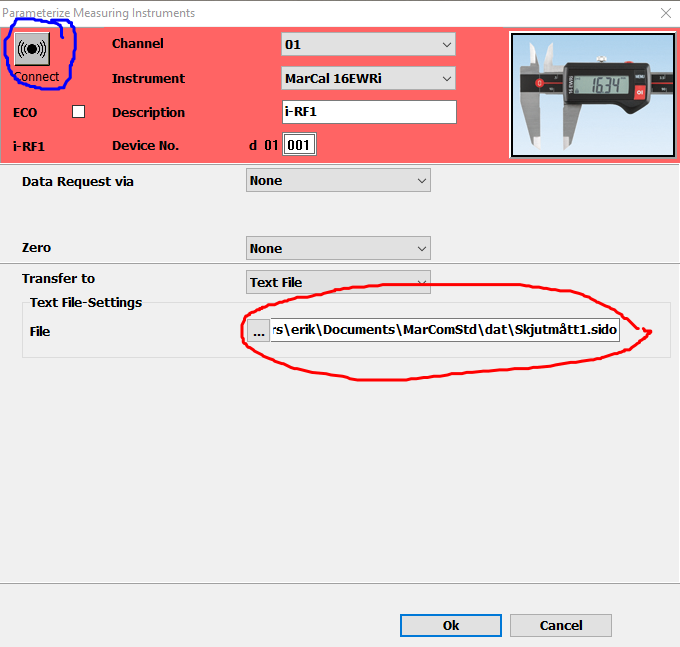
# | # Select '''”MarCal 16EWRi”''' and '''”Transfer to -> Text File”''' <br />Select where to save the text file. <br />The name of the file becomes the name that the meter will have in SIDO. <br />'''IMPORTANT! The file extension must be .sido''' <br />[[Fil:Mahr4.png]] | ||
# | # Connect to the meter by clicking the Connect icon in the same window (blue mark), not from the "home screen". Click OK and close the window. | ||
# | # When the caliper is connected the '''”connect-icon”''' becomes green and you will see the readings on the display. | ||
= Installation | = Installation of SIDO Board Measurement = | ||
# | # Execute '''”SIDOBoardMeasurement.msi”''' | ||
# | # Follow the instructions and install the application. | ||
# | # In the Windows Start menu, locate the program '''”SIDO Board Measurement”'''. Right click on it and select '''”Run as administrator”'''. | ||
# | # Enter the path to '''DIRECTORY''' where the .sido file is stored (point 12 under MarCom installation). | ||
# | # Enter the URL that you received from us in the second field. <br />[[Fil:Sido1.png]] | ||
# | # Click on Start service. | ||
# | # The program installs as a service in Windows. | ||
# | # Open '''”Services”''' in Windows and make sure the service is running. <br />[[Fil:Sido2.png]] | ||
# | # Make a measurement with value 0.0 <br />If the caliper is not already a registered meter in SIDO, it will be created and will then be visible both on the administration page in SIDO and selectable in the measurement of dimensions on the assignment display. | ||
# | # The caliper can now be used when measuring dimensions. | ||
Nuvarande version från 25 november 2016 kl. 12.29
Instructions for installing the caliper from Mahr and SIDO board measurement service.
Installation of MarCom
- Goto https://dam.mahr.com

- PIN-Code: L6L26
- Click ”PIN-Download” followed by ”Download” on next page.
- Download will start. The installation file is rather big, almost 100 Mb.
- When the download is complete, go to the directory where the file was saved and unpack the file ”MarConnect--MarCom_Standard--MarCom_5.1-2--SW—Standard.zip”.
- Execute ”S e t u p-MarCom.exe”.
- Follow all instructions and install all necessary drivers.
- The MarCom program starts automatically when the installation is complete. If it is not started, click on the MarCom icon on the desktop.
- Double click on the text ”Double Click Here”

- Connect the USB-stick to the computer.
- Add measuring instrument - ”i-Stick”.

- Select ”MarCal 16EWRi” and ”Transfer to -> Text File”
Select where to save the text file.
The name of the file becomes the name that the meter will have in SIDO.
IMPORTANT! The file extension must be .sido
- Connect to the meter by clicking the Connect icon in the same window (blue mark), not from the "home screen". Click OK and close the window.
- When the caliper is connected the ”connect-icon” becomes green and you will see the readings on the display.
Installation of SIDO Board Measurement
- Execute ”SIDOBoardMeasurement.msi”
- Follow the instructions and install the application.
- In the Windows Start menu, locate the program ”SIDO Board Measurement”. Right click on it and select ”Run as administrator”.
- Enter the path to DIRECTORY where the .sido file is stored (point 12 under MarCom installation).
- Enter the URL that you received from us in the second field.

- Click on Start service.
- The program installs as a service in Windows.
- Open ”Services” in Windows and make sure the service is running.

- Make a measurement with value 0.0
If the caliper is not already a registered meter in SIDO, it will be created and will then be visible both on the administration page in SIDO and selectable in the measurement of dimensions on the assignment display. - The caliper can now be used when measuring dimensions.